
Landscaping techniques
For this recipe you need: freezer, blender, coffee grinder, various sieves, scissors, stainless steel pan, furnace, tea spoon, skimmer laddle and bowl for dough.
Making your own ground foam
Although you can buy all sorts of ground foam these have rarily an acceptable colour and for N-use they are often too coarse. Producing your own ground foam is easy with help of some kitchen tools. Suitable foam can be found as source for making cushions, a natural uncoloured variety is best here and being not too thick say 2 or 3 cm. This is roughly cut into pieces using scissors and drenched in a bowl with water. The wet stuff is than put in a container or plastic bag into the freezer. When it is fully frozen it is put back into a bowl and the blender is exercised until you have a finely ground slurry of ice and foam. The foam is than sieved out and partitioned. Each batch can get a colour treatment using water based acrylic paint making slightly different colour mixes. Then it is time to let it dry naturally, just leave it several days on a news paper or such. The paint will of course make it into clumps again, but the size of the grains was however not yet good anyway. The next step is to take a batch and use the coffee grinder to create a blend with the right size of foam grains. Other batches can be made with slightly differing colours and grain sizes. Of course you can also steer the size and colour of off the shelf products into something more of your liking using the same procedures.
If you are not allowed to play with the kitchen tools 😞 than you can simply add the more important tools to your studio equipment. Particularly the coffee grinder is very handy for all sorts of model work requiring finely sieved stuff. The simple ones are already available between 10-15 Euro and these are fine for this purpose. 😊
Background bushes
Preparing individual tree skeletons for a large bushed area is only worthwhile if it concerns foreground matter that can be closely inspected. For larger areas in the background I developed another technique while building Bovigny in the nineties of last century. This was based on filter mat (for kitchen extractors) that was stuffed with pieces of horse hair to create the individual tree blobs. This method is quite succesful to fill a long background area.
On the show in Sint Niklaas in 2018 a great source of filter mat was brought to my attention that is very fluffy and cheap to obtain. It can be used in simulating all sorts of natural items in landscaping.
 A bag of Filter Wool for aquarium use, 250 g, enough for a life time of building model trees.
The above photo shows a bag of Filter Wool for aquarium use, its 250 g and contains enough for a life time of building trees, available for only a few euro's. There were 2 choices, white as above and an horrible sort of green. Below the description on top of the bag there are some pieces that were coloured into a better base colour using Dylon paint. The filter stuff is just dumped into a stainless steel pan with a boiling salty water mixture with half a tea spoon Olive green paint for an hour or such and than switched off and dried naturally. This colour suits most landscaping options best, although an alternative could be to use a brownish coffee colour.
 An old photo (2015) showing a still unfinished area on a quicky built module for the Splitveld roundy roundy set-up.
The material was tested on finishing one of the roundy roundy modules for Splitveld Fabriek on shows. The area around the tunnel was not finished as time before shows is always too short. The field on the right however does carry a sort of wheat in pale greenish colour that you can see on the more recent photo's. There was only a small piece of bush that you can see on the photo but this was still loose matter.
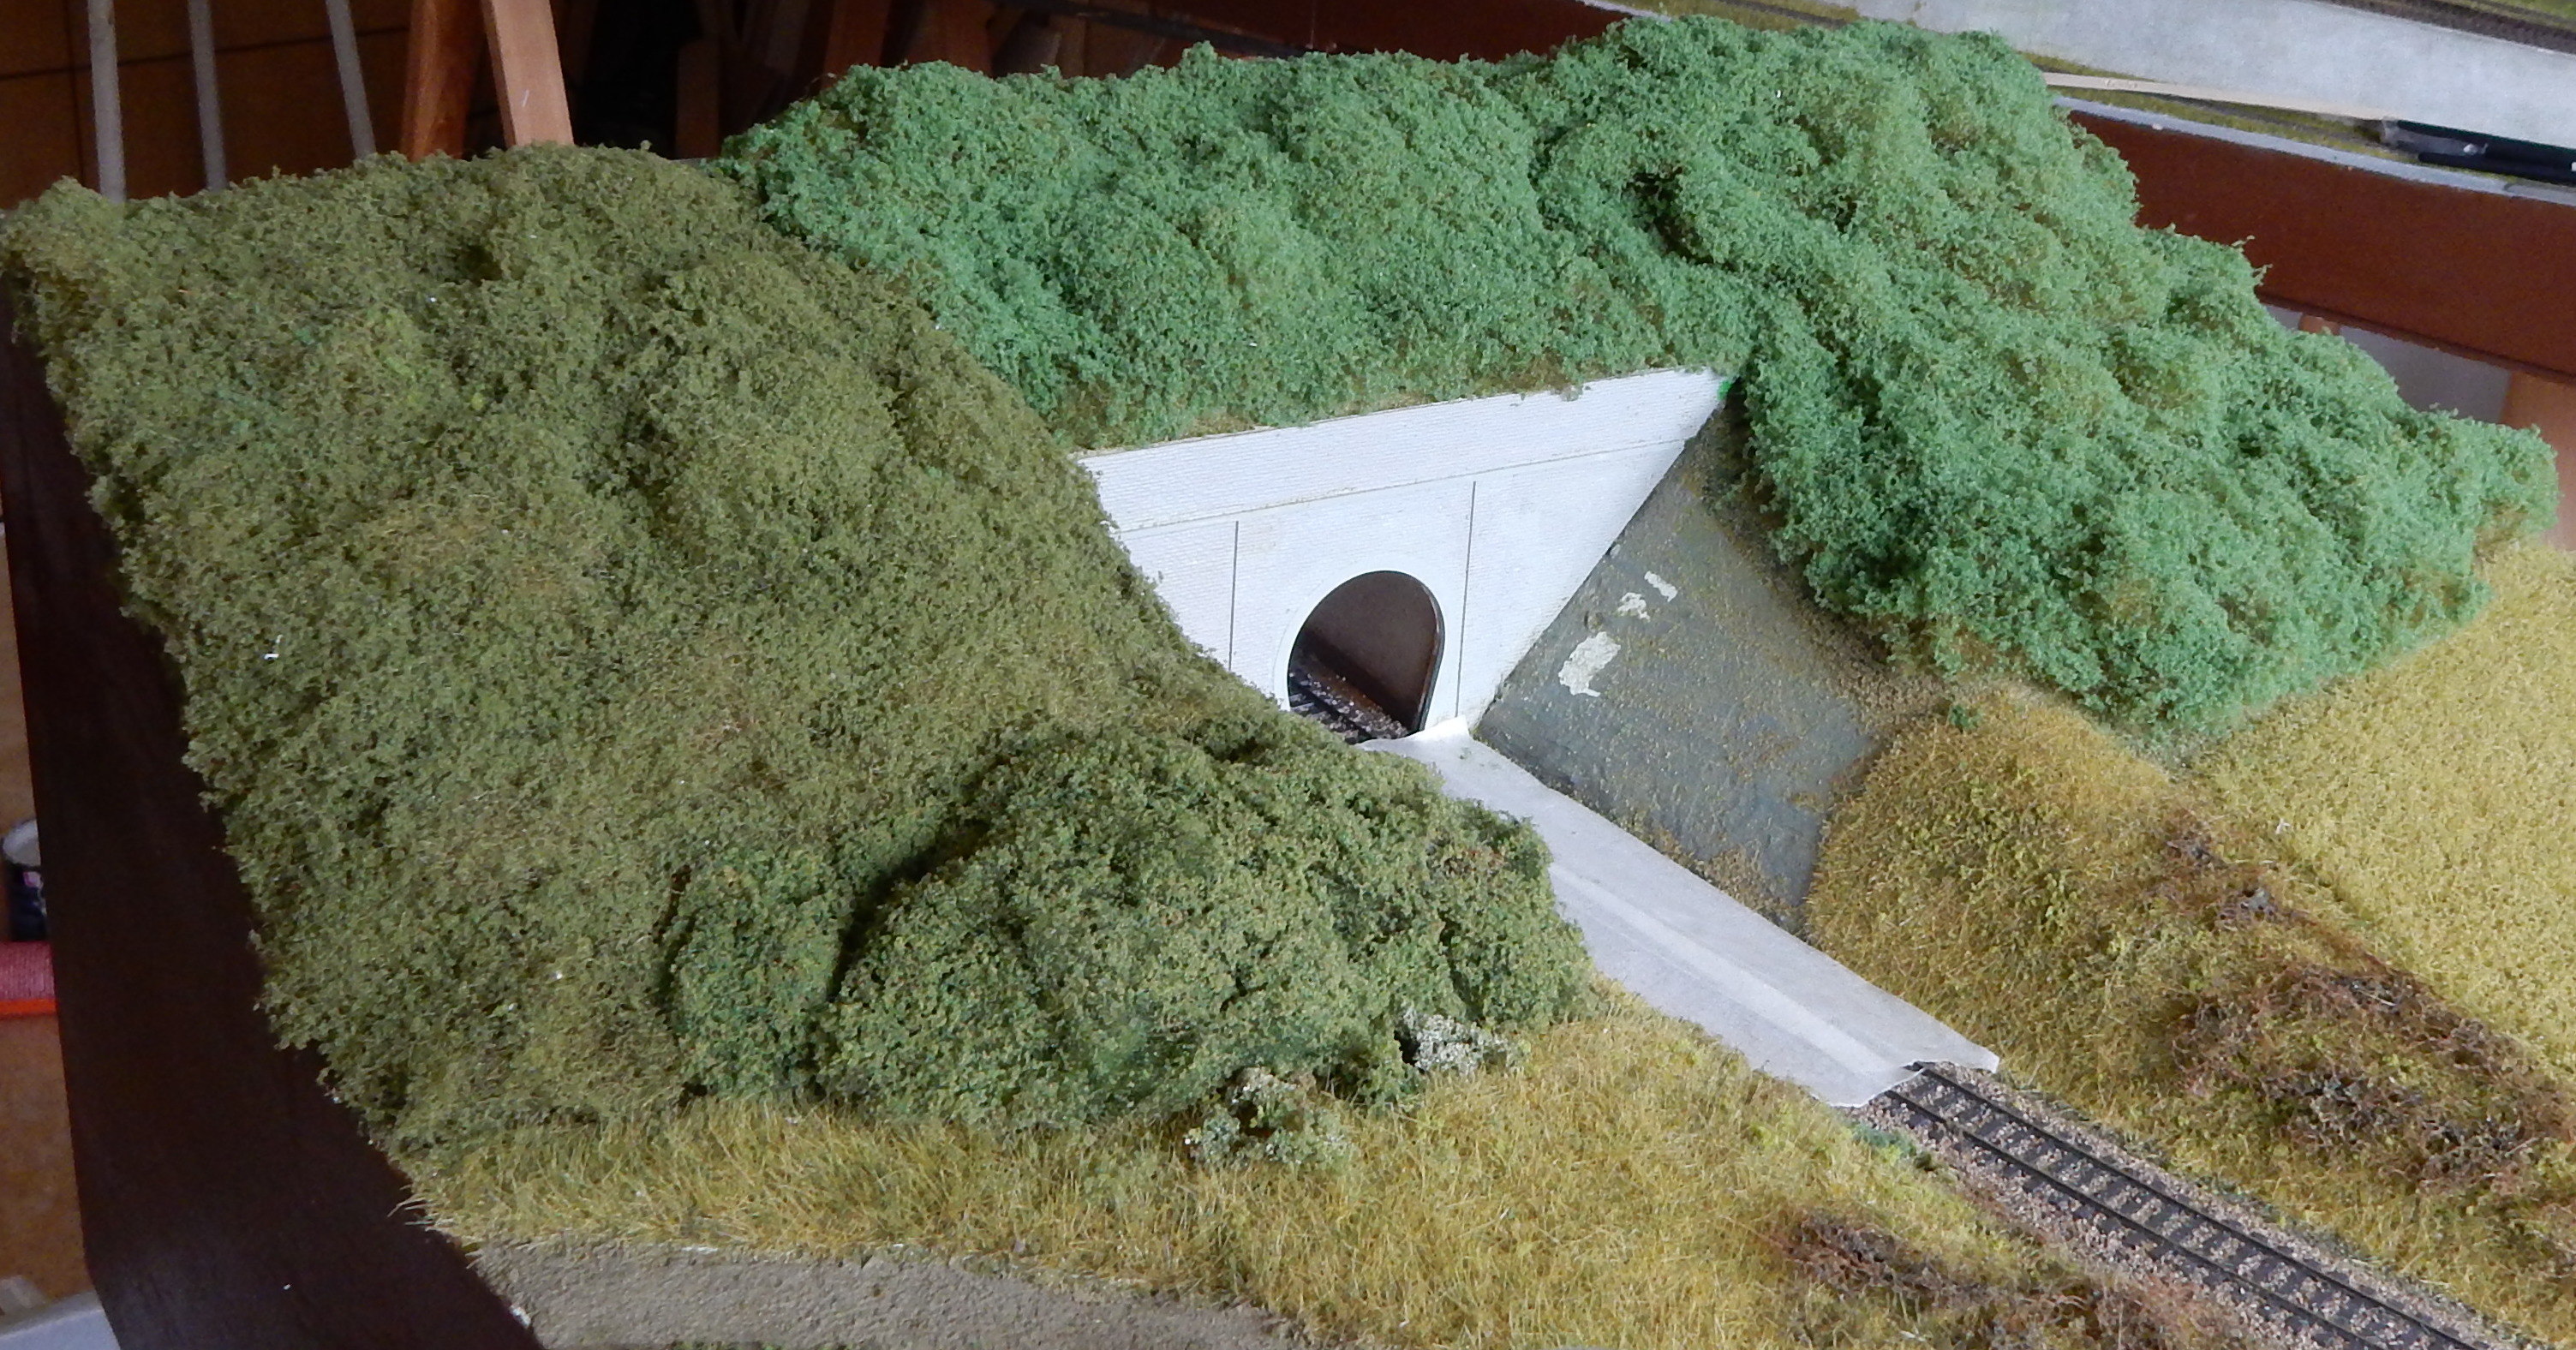 The area is now wooded but unfortunately showing 3 different colours of flock.
The material is simply made more bushy by pinching and pulling certain areas and overlaying these making suppressions elsewhere. There is no need to use horse hair as the material is relative thick and very springy. The material is cut to size with scissors before application and than sprayed with hair spray. Preferably the most sticky one (grade #5), transparent and no perfume unless you prefer else. Then a cover of finely ground foam with grains of 0.5 to 1 mm is sprinkled on top using a sieve, followed by another spray of hair spray for fixing. This sprinkling was done in a large plastic crate which collects the overspray and allows to recover the waste ground foam for recycling, more important is, that doing it this way the studio floor keeps clean. The material is fitted on the layout by spraying the bottom with a spray can with glue (Bison), this time in an even larger card board box, for the same reason of keeping the surroundings clean by catching overspray. This latter is much tackier than hair spray and not transparent. You will end up with a mess if it catches itself or just gets a chance to stick to where it not should.
The photo above also demonstrates what happens if you leave things too long. There are now three different colours of ground foam applied. Simply because apparently I didn't have this original colour blend any more, nor could I remember its composition, left above that something that does look to have the same tint but obviously misses a lighter coloured additional component and, of course as always, I did run out of that colour blend too. On the right hand side I applied some commercial material brought into the same flock size but this was still in an authentical rubbish sort off the shelf colour. Thus now we have another job in bringing it all together.
 The first treatment is a direct colour spray using the airbrush
The easiest way to do this is to bring out the airbrush and give it some further treatment. For some years now I am a satisfied user of a Harder & Steenbeck Infinity airbrush, but a simpler model will do here just as well. A good airbrush will pay itself back when applied on (home built) rolling stock, but the fact that you can use different nozzles in this model is a very useful property allowing to switch between jobs small or large or even coarse paints.
However this painting stage requires that the already finished landscape parts are covered up with paper, also the track was covered with paper tape. The above photo shows it after an initial layer of paint. The paint used is airbrush acrylic ink from Winsor & Newton in the colour of sap green with 2 drops of burned umber. The sap green in itself can not be used for anything because it is much too bright but mixed with raw or burned umber it can be turned into some decent olive green colour. (note: The W&N olive green is much too dark.) You can see on the photo that the bushes are now much closer in colour but not enough yet.
The next step was another light spray with hair spray followed by a very thin layer of Woodland Scenics turf (the very finest stuff) in a mix of blended green with 50% additional green sprinkled over the entire area, but there is no photo of this stage available.
 After the second painting session the area is uniform.
After applying the turf a new layer of paint was applied, this time using Talens gouache olive green. This is by far the most superior olive green in my collection of ready mixed olive green paints. As you can see the area now looks even and you cannot tell that it originated from 3 different colours of ground foams. Thus the good news is that effectively you only need a coffee grinder, an airbrush and a good selection of inks/gouaches for your landscaping. The bad news is of course that a good compressor and airbrush belong to the section of more expensive tools in my collection of modelling tools, the kitchen tool collection can be bought cheaper.
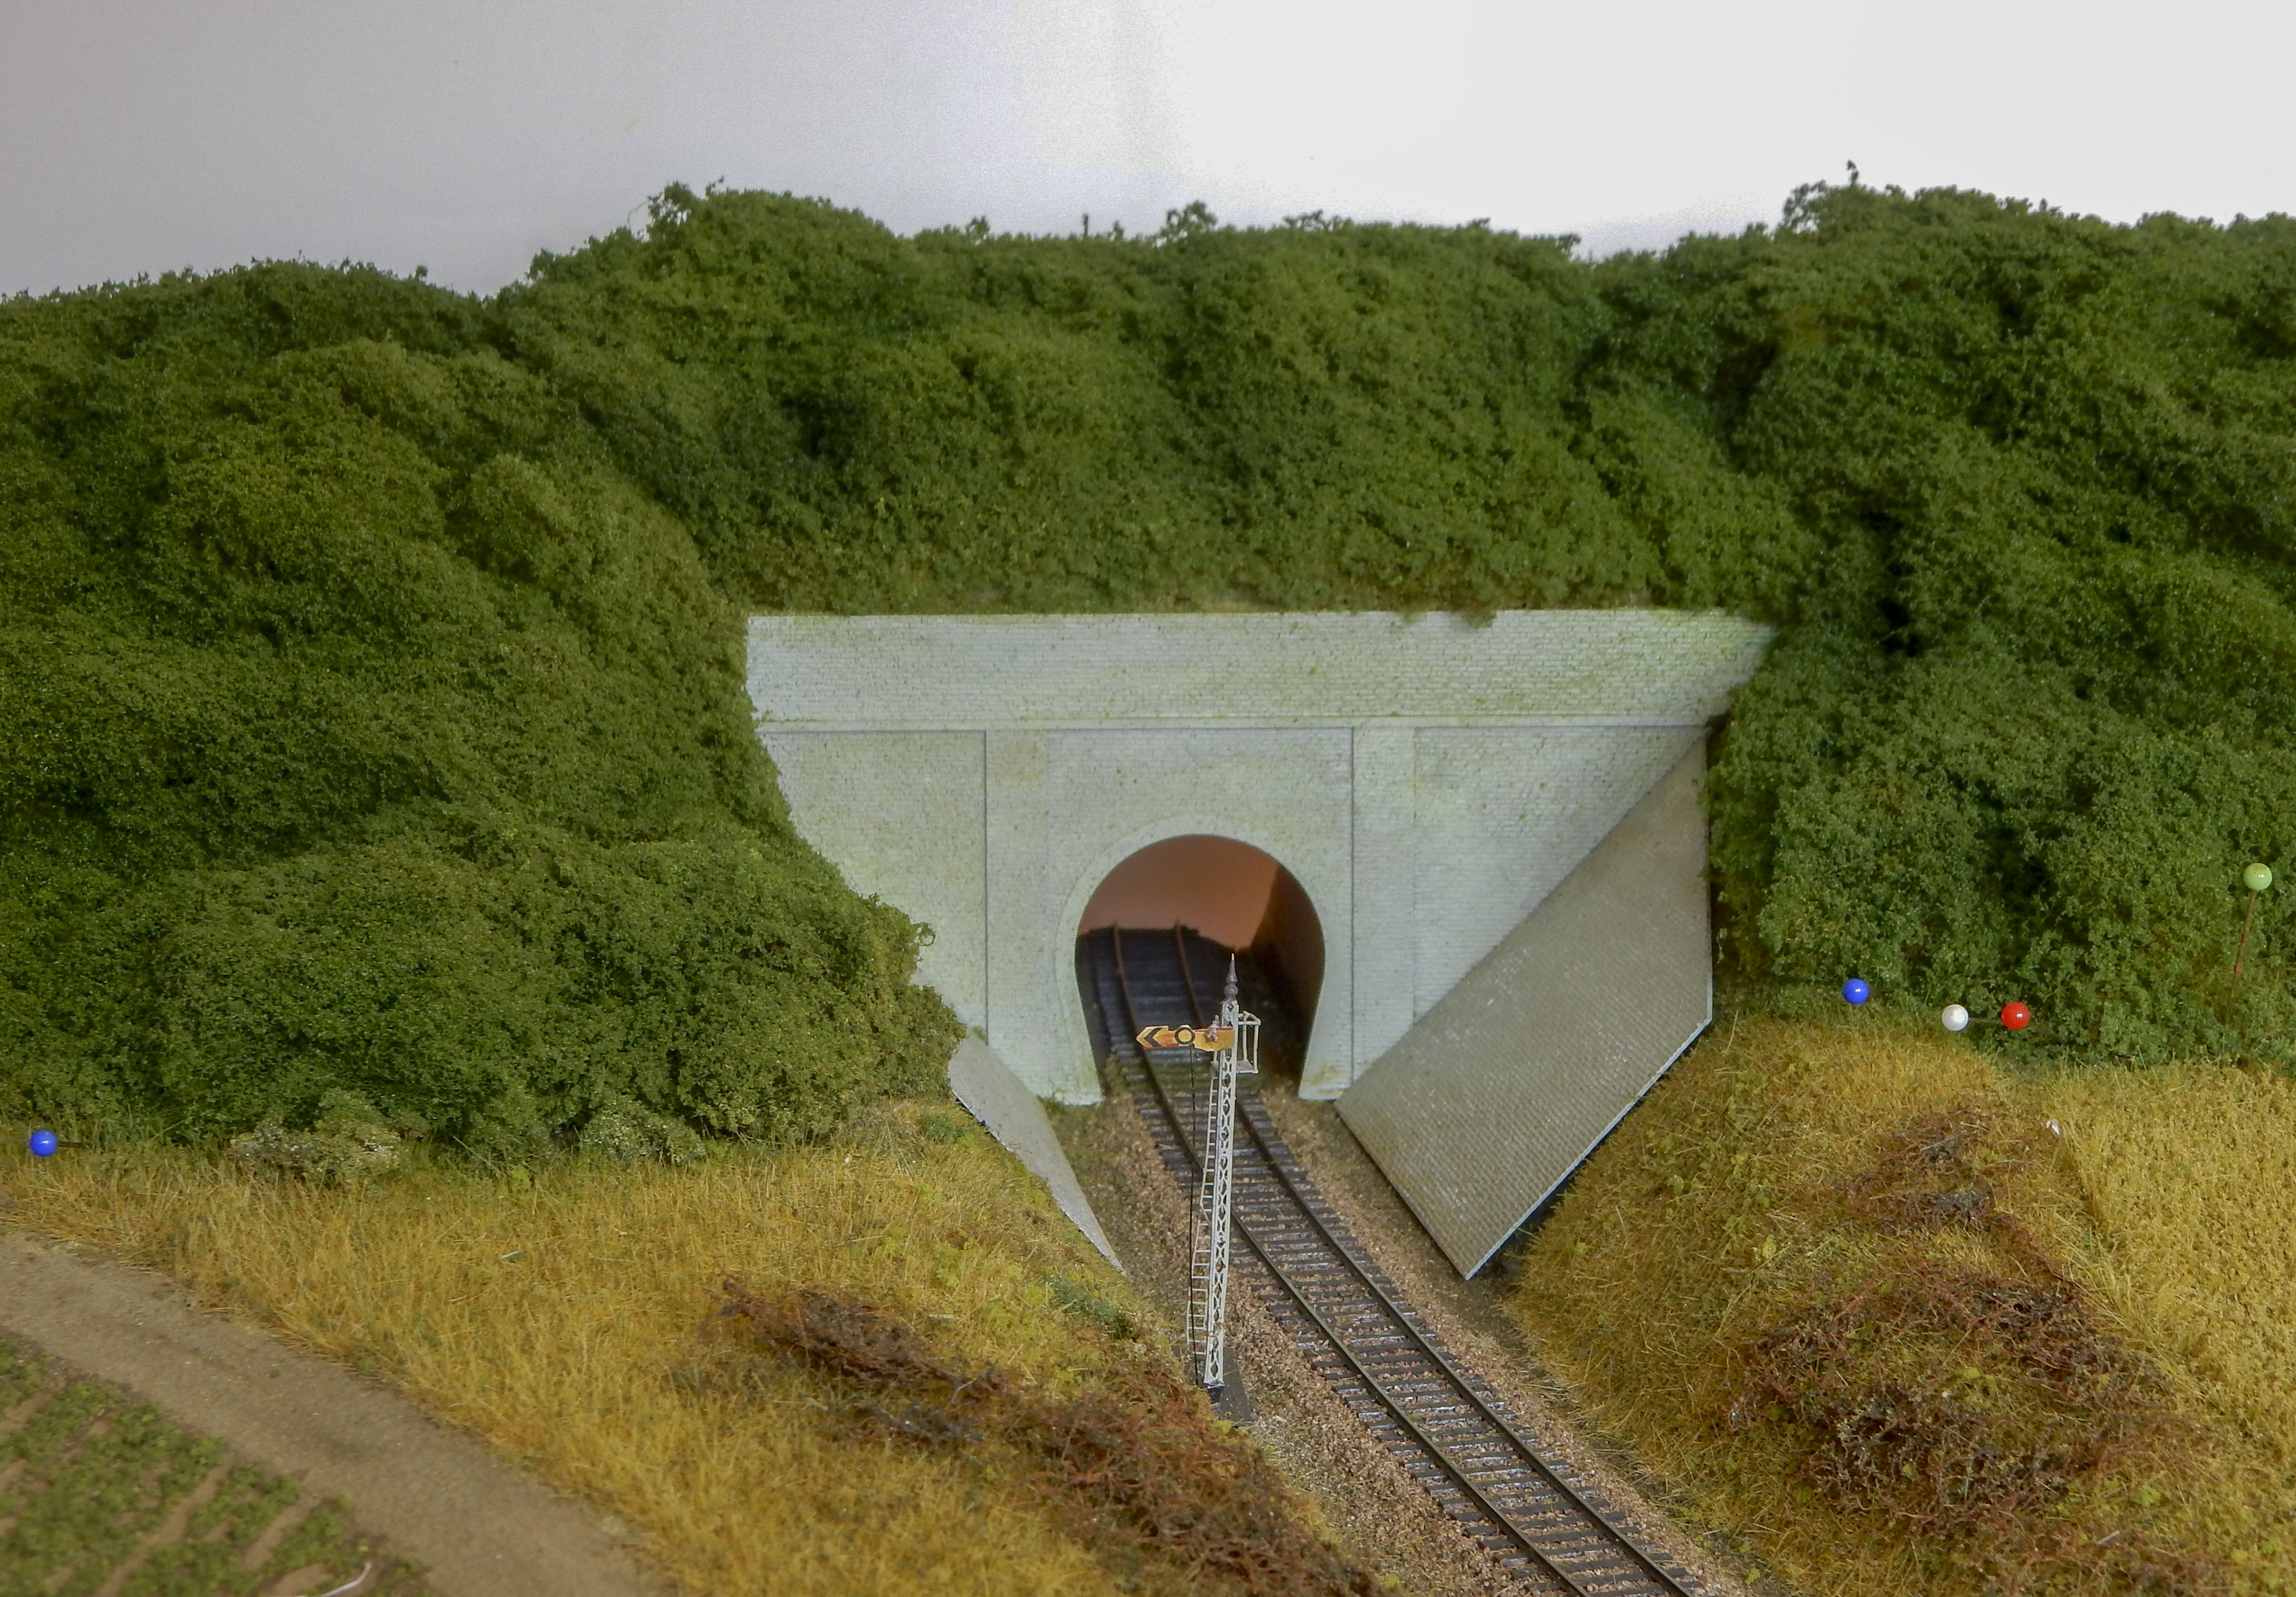 The tunnel entrance in bushed area.
Above photo shows the upgraded state of the module after playing around for an hour or 2 with filter material, foam, sieve, hair spray and airbrush. Writing it up and editing for producing this web page takes far more time than these two hours, which is why this process was not described until now. Above there are some pins visible where edges are temporarily pinned down until the applied white glue is dry to blend the edges better into the surrounding fields. Of course some further attention can be given to the bushes itself by creating more depth, this is where the rest of my collection of olive greens play a roll. Winsor & Newton and Schmincke Aero color both have ready mixed olive green acrylic inks that in itself are much too dark for direct application but are ideal in touching up the deeper lying areas to create shading effects, this will bring extra depth to the scene.
After the painting sessions the tunnel entrance is ready for further attention, the side walls still need to be fixed and it can do with some touching up and weathering of the walls using pastels and applying further ground stuff in the carving to finish this module.
 Current state after treating it with three tints off the shelf Olive greens.
p.s.
Schmincke Aero-colors seem currently the only representative left for this sort ready to use inks for airbrush application, they offer a choice of 36 colours in 28 ml bottles with pipette. The Winsor & Newton range of acylic airbrush inks was discontinued, but they still offer a colour range of gouaches available in tubes, which can be used like the Talens gouaches. The main difference will be that gouaches are water soluable even when dry, this contrary to dried acrylic inks.
Gouache is a posh word from artistic circles just indicating water colour paints
 An example of how you can use this technique in creating a large embankment area with trees. In the foreground the step is used for indicating some trees with trunks that rapidly changes into trees only seen from above. Monthermé PK-160, Expo Leuven 2018
Note that if you make a hinge at the foreground step you can transport the module flat without needing an extra high transport box for the mountain region.
copyright: Henk Oversloot
date: 24 Aug 2018
